catch-img

CONEXIOBlackBearで、TeamViewerを利用したリモートアクセスしてみる

はじめに

こんにちは。コネクシオIoTブログ 技術記事担当のHです。

前回まで3回にわたってCONEXIOBlackBearで機械学習モデルを動かしましたが、今回は少し趣向を変えて、リモートアクセスに関する記事です。

IoTデバイス等にリモートアクセスする著名なアプリとして、TeamViewerがよく知られています。私は、TeamViewerを使ってPCのリモートデスクトップを使用したことがありますが、CONEXIOBlackBearをはじめIoTデバイスでのリモートアクセスは試したことがありません。そこで、今回は、TeamViewerをCONEXIOBlackBearにインストールして、リモートアクセスできるか試してみたいと思います。

目次[非表示]

  1. はじめに
  2. 1. 環境
  3. 2. TeamViewerのインストール
    1. 2.1 準備
    2. 2.2 TeamViewerのインストール
  4. 3. TeamViewerの起動
    1. 3.1 TeamViewerアカウントとグループの作成
    2. 3.2 TeamViewerの初期設定
  5. 4. リモートアクセスを試す
  6. まとめ


1. 環境

  • CONEXIOBlackBear OS V1.1.9
    • ※一部、OS V1.1.5の画像が含まれますが、手順は同様です。
  • TeamViewer (有償版)
    • ARM向け
    • 15.16.8 (記事作成時点での最新)
  • Windows 10 PC
    • TeamViewerデスクトップアプリインストール済み
  • TeamViewerアカウント取得済み

※本記事で使用したものは、TeamViewerであり、TeamViewer IoTとは異なります。


2. TeamViewerのインストール

2.1 準備

まず、TeamViewerを動かすのに必要な依存ライブラリをインストールしてきます。

apt-get install libfreetype6 libxslt file ldd xz
apt-get install qtbase
apt-get install qtdeclarative
apt-get install libqt5sensors5
apt-get install qtlocation
apt-get install qtquickcontrols-qmlplugins
dpkg -i qtwebkit_5.9.4+git0+bd0657f98a-r0_armhf.deb
dpkg -i libqt5x11extras5_5.9.4+git0+922a92b533-r0_armhf.deb

​​​​​​​*qtwebkitとlibqt5x11extras5は、今回独自に用意したものです。


2.2 TeamViewerのインストール

TeamViewerアプリ(ARM Linux版)をダウンロードします。公式ページからのダウンロードなので最新版です。

wget https://download.teamviewer.com/download/linux/teamviewer-host_armhf.tar.xz

解凍します。

xz -dv teamviewer-host_armhf.tar.xz
tar xfv teamviewer-host_armhf.tar

インストールスクリプトを実行します。

cd teamviewer/
./tv-setup install force

インストールが完了すると、以下のように出力されます。

 Checking dependencies

 Analyzing dependencies ...

        All library dependencies (*.so) seem to be satisfied!

        QtQuickControls seems to be installed

 Uninstalling old package...
Removed /etc/systemd/system/multi-user.target.wants/teamviewerd.service.
[ 2142.928265] systemd-sysv-generator[1609]: Overwriting existing symlink /run/systemd/generator.late/bootlogd.service with real service.
[ 2143.394774] systemd-sysv-generator[1621]: Overwriting existing symlink /run/systemd/generator.late/bootlogd.service with real service.
Removing files.../opt/teamviewer/tv_bin /opt/teamviewer/doc /opt/teamviewer/logfiles /opt/teamviewer/config /usr/bin/teamviewer /usr/share/dbus-1/services/com.teamviewer.TeamViewer.service /usr/share/dbus-1/services/com.teamviewer.TeamViewer.Desktop.service /usr/share/dbus-1/system.d/com.teamviewer.TeamViewer.Daemon.conf /usr/share/polkit-1/actions/com.teamviewer.TeamViewer.policy

 Copying files...
  done

[ 2144.818363] systemd-sysv-generator[1671]: Overwriting existing symlink /run/systemd/generator.late/bootlogd.service with real service.
[ 2145.281379] systemd-sysv-generator[1682]: Overwriting existing symlink /run/systemd/generator.late/bootlogd.service with real service.
cp: cannot create regular file '/usr/share/applications/com.teamviewer.TeamViewer-Host.desktop': No such file or directory

Error: MakeMenuEntries failed

一部エラーが出てますが、デスクトップ環境用のファイルが置けなかったためのエラーで、今回は問題ありません。


3. TeamViewerの起動

3.1 TeamViewerアカウントとグループの作成

事前に、TeamViewerアカウントを取得しておきます。そして、PCのTeamViewerデスクトップアプリでサインインし、コンピュータ&パートナーというメニューの中の以下のボタンから、グループを作成します。ここでは、testという名前のグループを作成しました。


3.2 TeamViewerの初期設定

以下のコマンドで、初期設定を行います。

teamviewer setup

以下のように、TeamViewerのアカウントを入力し、デバイスの追加を行います。

Welcome to TeamViewer configuration.

This short guide helps you to setup TeamViewer on this device. After you have
successfully finished the setup, this device will automatically be available in
your Computers & Contacts.

Connected
Please enter your e-mail / username: メールアドレス

Please enter your password:
Initiating sign in

Adding this device as 'imx6qsabresd' to the group 'test' of your account ******. Do you want to continue? (y/n) [n]  y

Adding device to your account

Setting up your device

:

ここで、PCのTeamViewerアプリ画面を見ると、testグループにデバイスが追加されています。


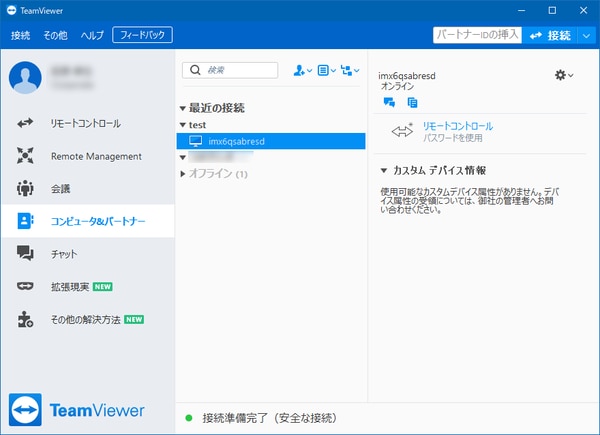
CONEXIOBlackBear上のTeamViewerアプリに接続するためのパスワードを設定します。リモートから接続するときに入力するので、十分な長さ、複雑さを持たせるようにしましょう。

root@imx6qsabresd:~# teamviewer passwd パスワード

ok

CONEXIOBlackBearを再起動します。

go-sys-reboot


4. リモートアクセスを試す

再起動後、teamviewerの起動状況を確認します。ちゃんと、デーモンが立ち上がっています。※ちなみに、インターネット接続がないと、デーモンが立ち上がらないようです。
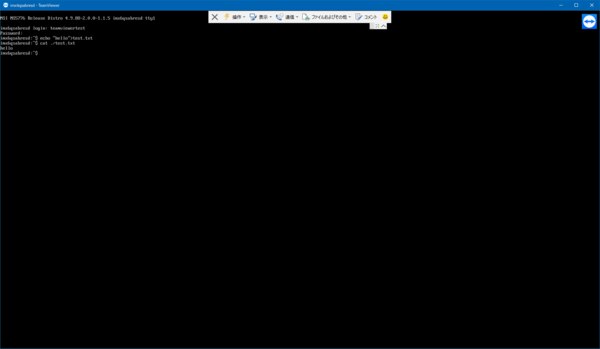
root@imx6qsabresd:~# teamviewer info

 TeamViewer                           15.16.8  (TAR_IN)

 TeamViewer ID:                        **********

 teamviewerd status                   ● teamviewerd.service - TeamViewer remote control daemon
   Loaded: loaded (/etc/systemd/system/teamviewerd.service; enabled; vendor preset: enabled)
   Active: active (running) since Wed 2021-03-31 12:32:56 UTC; 1min 52s ago
  Process: 696 ExecStart=/opt/teamviewer/tv_bin/teamviewerd -d (code=exited, status=0/SUCCESS)
 Main PID: 698 (teamviewerd)
    Tasks: 18 (limit: 4915)
   CGroup: /system.slice/teamviewerd.service
           mq698 /opt/teamviewer/tv_bin/teamviewerd -d


いよいよ、接続してみます。

PCのTeamViewerアプリから、デバイスをダブルクリックすると、接続が開始され、パスワード入力が求められるので、3.2で設定したパスワードを入れると無事接続できました。

試しに、以下のようにログインしてコマンドを打ってみました。ちゃんと、動いているようです!!!


というわけで、TeamViewerを使って、CONEXIOBlackBearへリモートアクセスができました。

使用感としては、コマンド入力に対する多少のタイムラグがあります。とはいえ、TeamViewerに限らずリモートアクセスでは多少なりともタイムラグはあるのでこういった部分は仕方ないでしょう。

まとめ

以上のように、TeamViewerを用いたリモートアクセスができました。もしも、実運用時にトラブルがあった場合、現場に行かずに、素早く対応する手段として役立つと思います。(トラブルは無いに越したことはないですが。。。)


本記事は、担当書き手の個人的感想を述べるもので、コネクシオ株式会社を代表する意思表示をするものでは有りません。

コネクシオのソリューションが5分でわかる!
工業・農業・オフィス・車両・インフラなど、
各分野から抜粋した代表例をご紹介
ご質問やご要望はこちらから
お気軽にお問い合わせください

閉じる
製品情報
最新記事
サイト内検索